


How excluding select records from campaigns increases sales
Critical to the success of any email campaign is the selection of the subscriber segments you choose to send the campaign to. But how closely do you consider the segments of subscribers who you should exclude from your campaigns?
By choosing to not mail a key segment of your subscribers can increase your sales across the campaign period.
To be active in an automation a subscriber has met a business rule triggered by their interaction with your store, examples would be an abandoned cart, a recent purchase or for a new subscriber they have signed up for email.
When subscribers are active in an automation we believe the subscriber should not be mailed any other activity, this approach is designed to enable the automation to have the subscribers full attention, without any interruptions from other activity, that might dilute the impact of the automation and in some cases contradict the message or offer of the automation.
In A/B tests we have found that automations perform, on average, 26% better when they are not interrupted by other campaigns.
In conjunction with excluding subscribers who are active in an automation we also now exclude subscribers who have recently purchased, generally this is in the last 10 days. If you have a post purchase automation enabled these subscribers will be excluded as a consequence of that.
Finally, we also exclude all recent new subscribers from all campaigns, again these maybe excluded as a consequence of an enabled Welcome Automation.
How to set up an Exclusion Segment
Log into your Omnisend Account and follow the following steps:
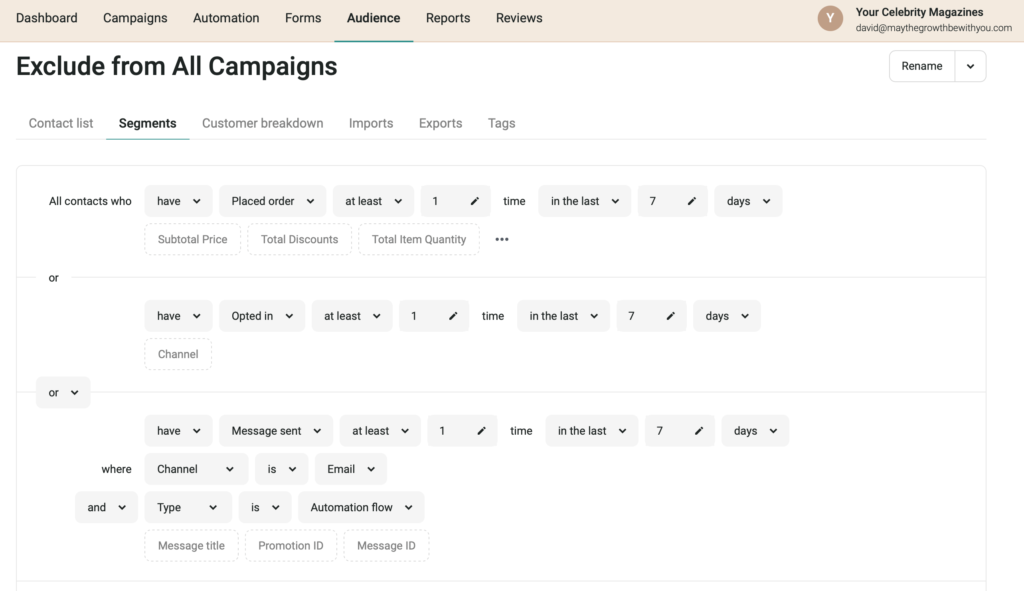
- Select >Audience > Segments > Create a Segment > Create from Scratch > Add Filter
- From the drop down menu select > Placed Order
- Adjust the time for the order from in total to In the last and use the default of 7 days.
- Now add the second filter > Add filter
- Change the condition from and to or
- From the drop down menu select > Opted in
- Adjust the time for the subscription from in total to In the last and use the default 7 days.
- Now add a second “group” of filters by selecting >Add group of filters from the options presented when you click the “v” positioned to the left of add filter.
- In the new filter group select > Add filter and from the drop down menu select > Message sent
- Adjust the time for the sending from in total to In the last and use the default 7 days.
- Now select > Channel from the 3 options sitting beneath the message sent filter.
- In the pink field type email and then select email from the options presented by checking the box by email.
- Now select > Type from the 3 options sitting beneath the channel filter.
- In the Pink field type Automation flow and then check the box for this option when it appears.
- You have now added all the filters to create the segment so proceed to select > Save and show contacts
- You will be prompted to name your segment, we use “Exclude from all Campaigns”
- The segment has now successfully be created and the contacts who currently meet the criteria of this segments will be listed.
The final filters for the segment within Omnisend are shown herewith:
How to exclude the segment from a campaign
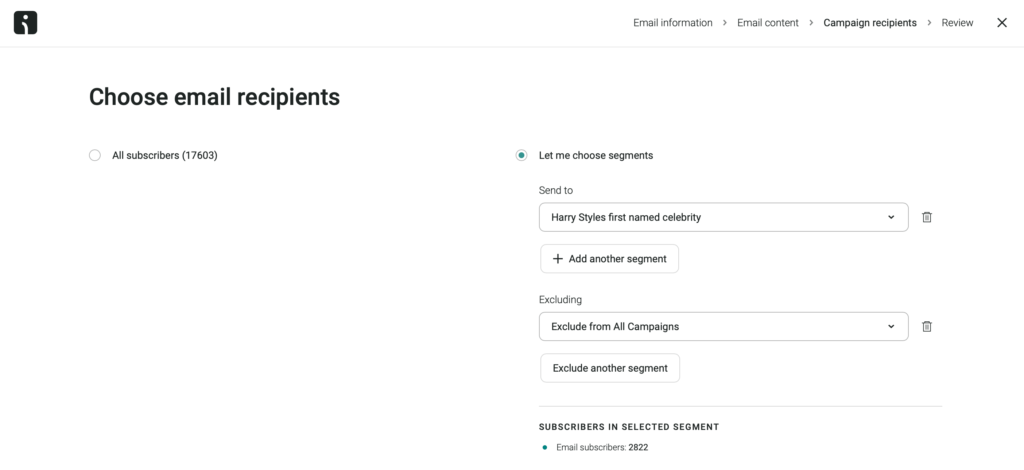
If you are mailing the campaign to all your subscribers select the “Exclude Segment Button which will reveal a drop down with a search bar, enter the name of your Exclusion List and then select this to be excluded from your campaign.
If you are selecting individual segments from your subscribers to be sent the campaign click the radio button to Let me choose segments proceed to select your segments. Once you have selected all the segments to be included in the campaign proceed to click the Exclude segment button.
To select the segment to be excluded select the “v” in the select field and type in the name of your exclusion list in the search bar. Select your exclusion list and proceed to review your campaign, prior to sending.
The screen shot below shows the selection and adding off the exclusion list to a campaign.
The benefits of using a Exclusion Segment
By setting up and using this exclusion segment in your campaigns you’ll derive 3 key benefits:
- Your Automations will perform better – subscribers active within your automations will not be distracted by the arrival of campaigns within their inbox which might conflict or contradict the automation messaging.
- A Positive Experience for new subscribers – having acquired a new subscriber it is important their initial interactions with your brand are positive as they lay the foundations for the ongoing relationship. Your Welcome automation is specifically designed to onboard these new subscribers with a specific story, offer or messaging, a campaign arriving during this will dilute the impact of your Welcome automation and reduce the propensity of the subscriber to convert to a buyer.
- Respect your subscribers in box – the use of an exclusion segment show that you are respecting your subscribers inbox and are treating the relationship as one based on quality of interaction as opposed to frequency of interaction.