


Omnisend email marketing hacks to turbo charge your email campaigns
To fully leverage the power of Omnisend adopt these Hacks to lift your campaigns and automations to a new level.
Addressing Customers whose first name you don’t have.
Managing message priorities to avoid conflicting offers.
Compress Images to load super fast.
Display images as full width in your Omnisend template.
Create a BNPL Customer Segment.
Convert one time purchasers to multi time purchasers.
Acquire Zero Party data at the point of subscription.
Master Exclusion Segment.
What are Hacks? Why Should we use them?
Omnisend is packed full of features, but how do you discover those that will lift your email campaigns performance? This is where our List of Top Omnisend Hacks will help.
We have compiled the hacks that we use to fine tune our Omnisend email campaigns, all are designed to add an additional layer of fine tuning to your campaigns, creating more engaging, responsive campaigns.
1. Addressing Customers whose first name you don’t have.
Including personalisation in campaigns is a winning formula, but what about those customers or prospects who have not provided their first name, how can we address these in an engaging manner, when we are adding personalisation to our campaigns?
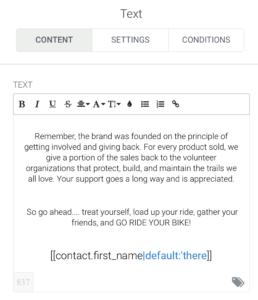
You can define a specific text (fallback text) that will work as an alternative were the First Name value is empty, we have illustrated where the default text |default:’there should be added to your personalisation.
Hello [[contact.first_name|default:'To apply this to your personalisation firstly select to add “name” as your personalisation field and add this to your content.
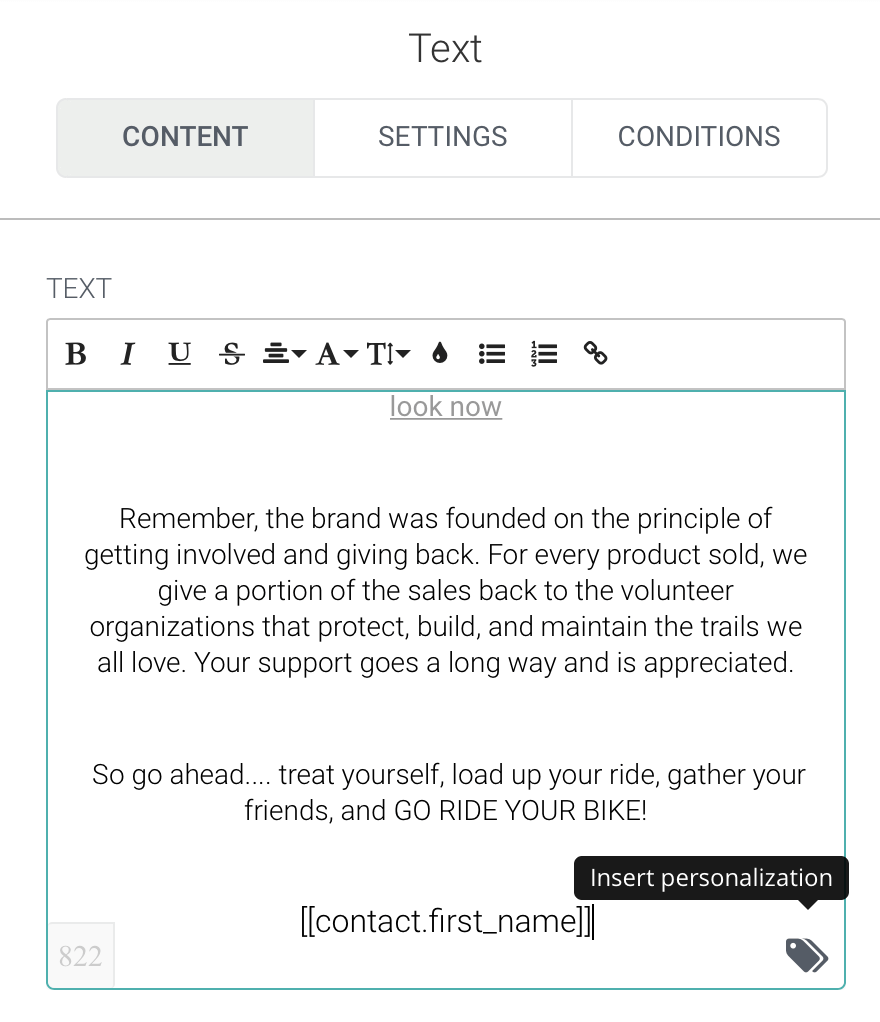
To add the default personalisation of “Hi there”, simply add |default: ‘there’ after the name, ensuring this content sits within the double brackets, as shown above. You can see that we have placed it below, for this demo we have highlighted the text we added in blue. Once you have added this continue to Save the changes.
2. Managing message priorities to avoid conflicting offers.
Welcome Automations, sent to new email subscribers, tend to include a discount code to entice the first purchase, this discount is often one of the highest that will be offered across the customers lifetime. Consequently we want to ensure that this discount is communicated clearly, and strongly, without any interruption.
If you have an abandoned Cart Automation set up their’s a high probability that your Welcome recipients may receive your Abandoned Cart Automation messages, at the same time they receive the Welcome Automation. How could this happen?
The scenario goes like this, a new visitor to your store signs up to your newsletter via your Pop Up form. They then browse your store and place a couple of items into their cart, and then leave the store, without completing a purchase.
This visitors activity has potentially triggered two automations, The Welcome, with the Introductory discount, and the Abandoned Cart.
If we have not configured Omnisend to recognise this situation, and send just one of these automations, the prospect will receive both automations across the same time period, which will cause confusion and leave the prospects inbox a little too populated with your emails.
To prevent this from occurring we need to set some business rules within Omnisend, to give the Welcome Automation priority over the Abandoned Cart Automation, for all new email subscribers.
Step 1. Create a Tag to identify Welcome Automation Recipients
- Navigate to your Welcome Automation
- Drag “Tag Content” box into your Automation below your Audience Definition Box
- In the Right Hand Column ensure “Add” is selected
- Create a New Tag by Typing the Name of the Tag, this could be “Welcome Automation Recipients”. Save this tag when prompted.
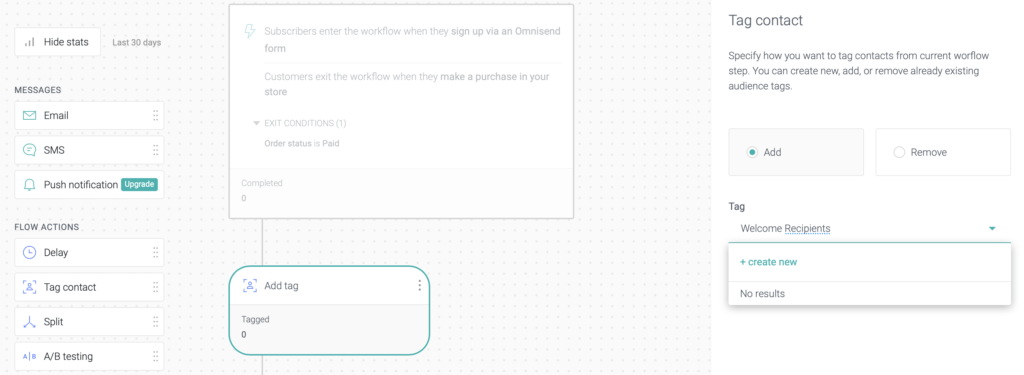
Here we can see the Tag has been created, and is now within the Automation.
Step 2. Adding the Exit tag
Here we need to add an Exit Tag to the Automation, this ensures we only Tag records within this Automation.
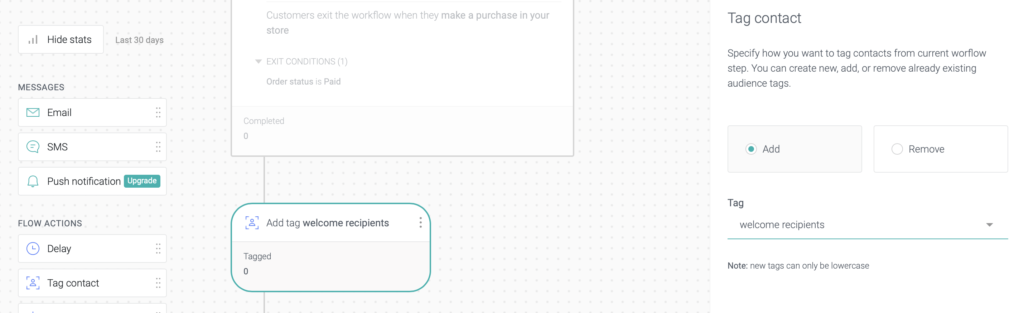
- Drag a “Tag Content” box into your Automation as the final step.
- Now configure this in the left hand menu to “Remove” the Welcome Recipients Tag, and then click cave when prompted.
- Finally update your Workflow to activate the tag.

Step 3. Adding the tag as a Filter to our Abandoned Cart Automation
To prevent any Welcome recipients from receiving the Abandoned Cart across the same time frame we now will add the Tag to this Automation.
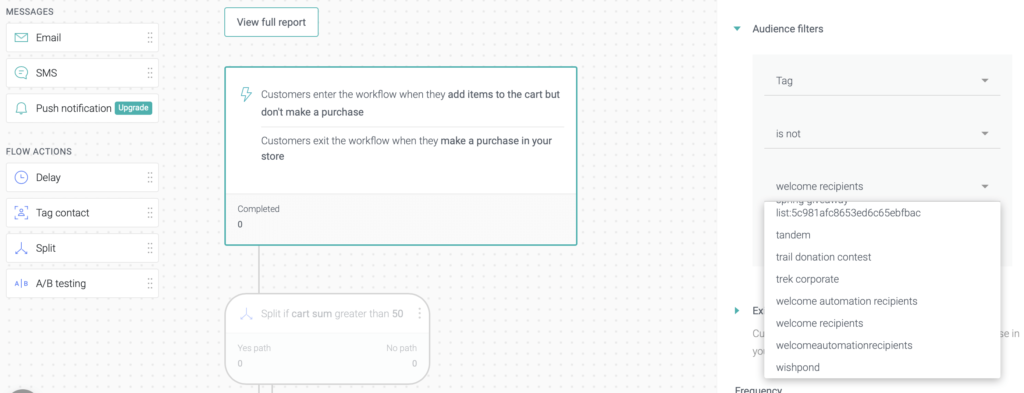
We click on the first Box at the head of the automation which defines our Audience.
To add the Welcome Recipients as an audience exclusion filter here we select Tag “is not” Welcome Recipients and click Save when prompted.
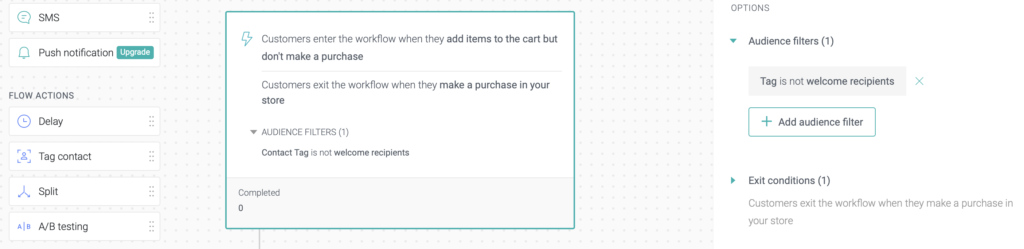
We can now see the Audience Filter for Welcome Recipients within the Audience Box.
To activate this we click “Update Workflow”
3. Compress Images to load super fast
We can’t assume that all our recipients are always on super fast internet connections when they receive our emails, so we want to make every effort to deliver the best user experience for all connection types.
Images are great in emails, they tell the story and display product superbly, but nobody want to experience a delay in the image download.
To mitigate this we compress all images prior to uploading to Omnisend.
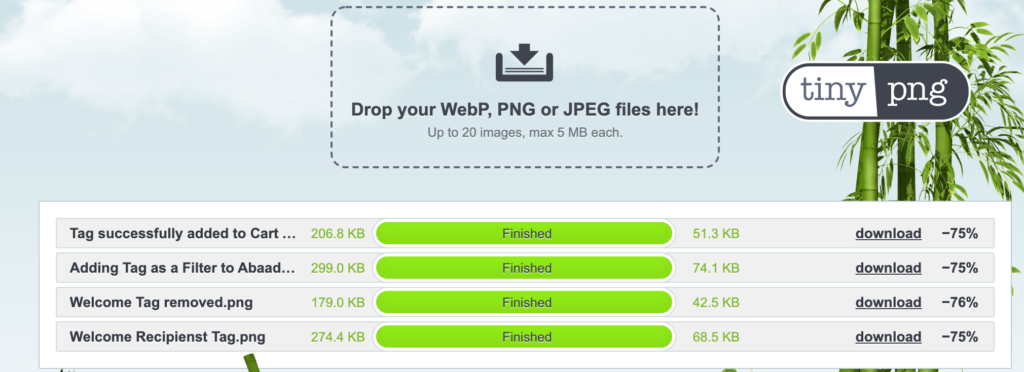
Our favoured tool for this is Tiny.PNG.
As can be seen from the example below, the images we have uploaded to PNG have been compressed by over 75%, with little to no impact on the quality of the images.
To compress your images visit Tiny PNG , preferably using Google Chrome and then upload your images that are to be compressed. Once compressed select to download the images to either a Drop Box Folder or your computer. IN both cases the compressed images will be downloaded in a Zip file.
4. Display images as full width in your Omnisend template.
For maximum impact images displayed across the full width of your template work best.
To publish your images at the full width, which is 640px you should look to upload your images with a width of at least 1280 px, this will ensure they’ll render perfectly across the full width of your Omnisend template, across all devices.
5. Create a BNPL Customer Segment.
We are seeing a significant increase in the proportion of our Shopify Store clients sales that are being paid for via BNPL providers, in some cases we have seen that over 50% of sales are paid for via a BNPL service.
When we analysed these customers we noticed they where showing some distinct shopping behaviours. In response to this we created a distinct audience segment for those customers paying with BNPL and developed campaigns that where targeted solely at this segment. By addressing their preferred payment method within our emails we saw an uplift in both response and sales.
Our most successful campaign was an Exclusive offers for AfterPay (An Australian BNPL provider) customers, where the email showed the pricing of the offers relative to how the customers would pay for the products via 4 equal monthly instalments.
To create a BNPL segment within your audience add an Order tag to all the orders that are placed using BNPL. In this case, Omnisend’s API won’t be needed, as the order tag will be synced along with the order data. This tag will be automatically created the moment the order is created, not after some time, as the order tag should be synced with all the initial order data to be able to send different order confirmations based on this payment method.
6. Convert one time purchasers to multi time purchasers.
From analysing of hundreds of Shopify Stores Audience data we know that most stores have around 70% of customers who have only ever purchased once.
In many instances these purchasers have been acquired by paid media channels and often been incentivised to place their first order with an introductory discount. The net result is that these one time purchasers often contribute little, to no, profit to the store.
One of most effective hacks is to create a discrete segment of these one time purchasers and develop an email automation which focusses very clearly on converting the customers to a second purchase.
Our Audience selection for this automation is all customers who have ordered 1 time in the last 45 days.
The messaging we use across the automation includes the following:
- Feature best sellers – we know that our best sellers are popular and have the highest propensity to deliver a sale.
- Offer Free delivery on orders over $X – If you already offer free delivery, reduce the order value as a one off.
- Clearance Stock – Include an email in the Automation which only features clearance items.
By targeting these 1 time purchasers with discrete messaging we see conversion rates of 20-40% to a second purchase with ROI in the range of 40x on marketing spend.
7. Acquire Zero Party data at the point of subscription.
With the evolution of the Pop Over form builder in Quarter 3 of 2022 we are now able to collect Custom Preference Data within the Omnisend Pop Over forms.
So for example, if you are a Clothing Brand you can now provide the subscriber with the option to choose which categories from your range they would like to hear about, so in its simplest form this might be choices of Female, Male or Kids.
At a more granular level we have used this feature to acquire subscribers preferences, so for example for our client Your Celebrity Magazines, the most valuable data point we would like on each subscriber is their favourite celebrity. The new Pop over forms enable us to collect this at the point of subscription and then customise all on boarding emails relative to that data point. This initiative is delivering open rates for the Welcome program in excess of 70% and click through rates in excess of 20%, but perhaps the most impressive result is the conversion rate of clickers to sales is running at 67%.
The form we have developed to acquire this “Favourite Celebrity” data point is shown below. We choose to use a free form field as opposed to a drop down as the drop down approach would have to feature too many choices to cover all eventualities, hindering the customer experience, and in turn reducing completion rates.
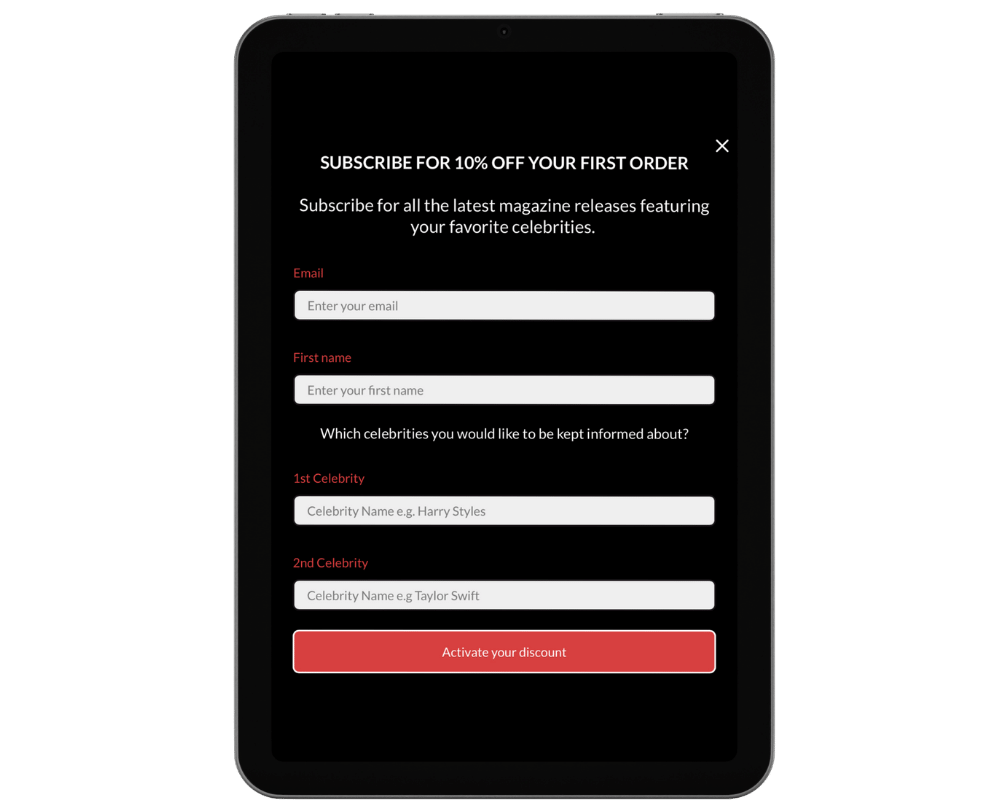
With the evolution of the Omnisend form builder in October 2023 you are now able to A/B test all your forms. In the case of the above we’ll be testing using a free form field versus a drop down to collect the celebrity details.
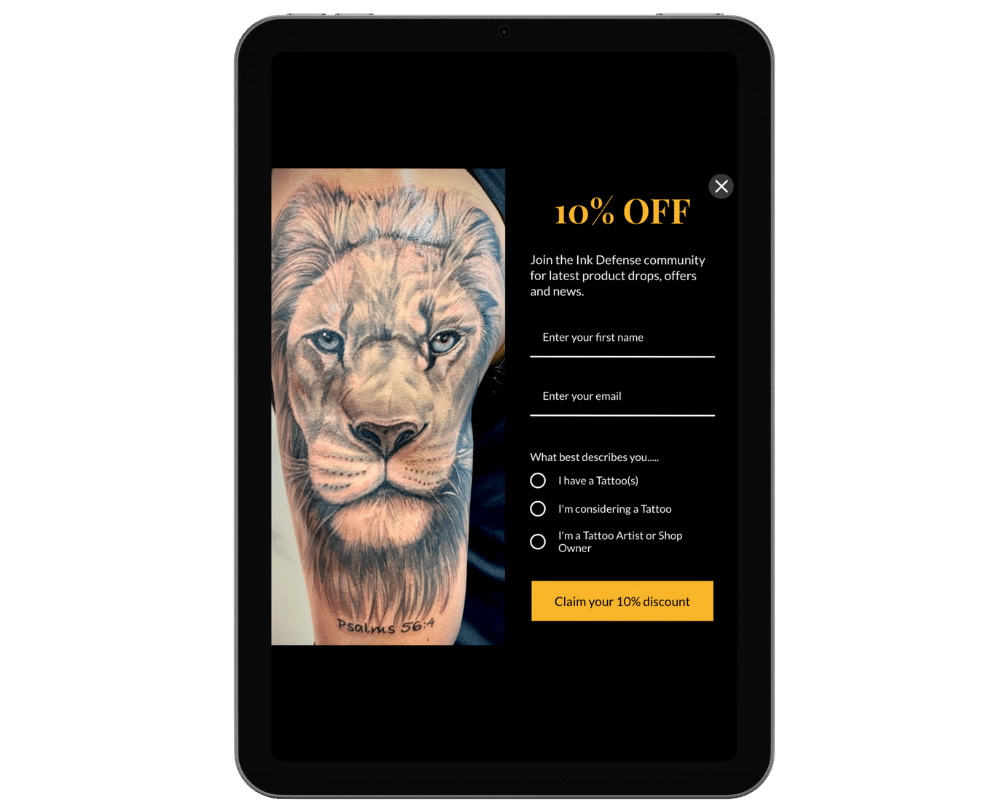
Recent tests we have conducted, with a focus on the collection of zero party data have included a Popover form which asked subscribers to Ink Defense Tattoo, a Tattoo Aftercare retailer, to confirm if they already had tattoo’s or if they where contemplating their first tattoo.
The form also sought to acquire data to confirm if the subscriber was a studio or tattoo artist, this segment of subscribers where then sent a Welcome Automation which focussed on the Wholesale offer from Ink Defense Tattoo.
Armed with these data points we where then able to significantly improve the relevance of the Welcome Automation content, as those contemplating their first tattoo, versus those with existing tattoos, have very different information requirements when considering tattoo aftercare.
The popover form used to acquire this zero party data is shown below.
8. Master Exclusion Segment
For your automations to perform at their most effective we have found it is important that customers are not sent any other automations or campaigns whilst they are active in an automation.
This approach ensures that the automation in which the customer is live has the “exclusive” attention of the customer with no interruptions from other messages which may well have conflicted with the messaging in the automation.
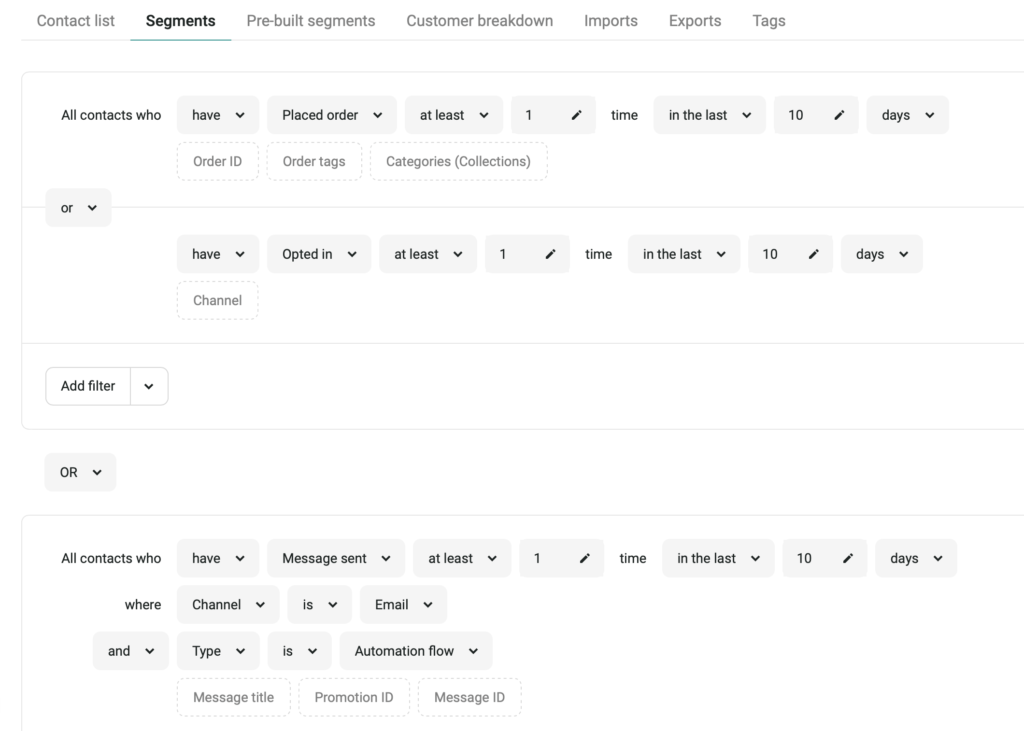
The Master Exclusion Segment is configured to ensure customers never receive multiple messages (automations or campaigns) across the same period.
When selecting your audience for a campaign, this Master Exclusion List should be selected as a segment to exclude.
The audience segment is shown below.